The Variance function is used to record changes to Inventory Quantity On Hand resulting from physical counts of Inventory taken either by hand or using a portable data collector. The Quantity On Hand of an Inventory record is updated by adding the Variance quantity to the current Quantity On Hand. The Variance quantity is the difference between the Keystroke Quantity On Hand and the actual physical quantity counted. Difference between physical quantities and the current inventory levels are recorded and saved on Variance Transactions.
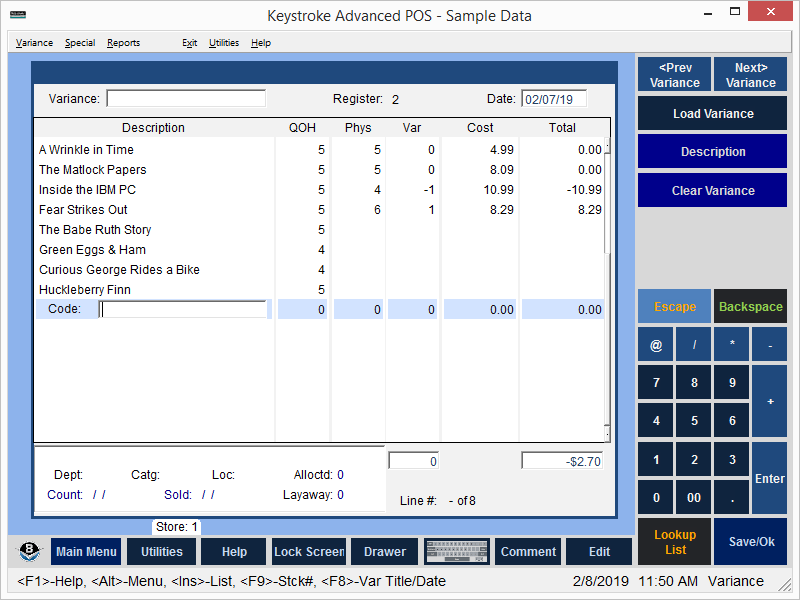
The Variance Transaction entry screen is similar to a Sales Transaction screen. The Variance Transaction records the difference between Quantity On Hand (QOH) and current stock levels at a specific date and time. The top of the Variance screen displays the Variance Description (i.e. Book Department Count or March Physical Inventory), the Register Number at which the Variance was saved and the Date on which the Variance was saved. The body of the Variance screen displays each line item's Description, QOH, Physical Qty, Variance Qty (the difference between QOH and physical count for which the QOH is adjusted when the Variance Transaction is Posted), Cost, and Total Cost. Each Variance Transaction may include a Variance Comment and each item on a Variance may include a Variance Item Comment. Each Variance Transaction is saved with a Variance Description, Register Number, and Date. Saved Variance Transactions may be viewed, edited and reported just like Sales Transactions.
A Variance Transaction "in progress" is referred to as an Unposted Variance and typically includes items that have been counted, but their counted amount has not yet been entered. Unposted Variances may be opened, updated, and re-saved as often as needed until all items' counted amounts have been entered. When an Unposted Variance is in the process of being updated (counted amounts are being entered), it is saved in the file VAR#.TMP. When an Unposted Variance is saved, it is saved in the file VAR#.DAT. The # character in the file name represents the Register Number at which the Variance is saved. Each Register may have one Unposted Variance Transaction (typically containing only the items being counted and updated at that Register) which is displayed automatically when the Variance Sub-Module is entered.
When all the counted amounts have been entered for all the items contained on an Unposted Variance, the Variance may be Posted. When a Variance is Posted, the QOH for each item is updated by the Variance amount (the difference between the QOH and the counted amount). Posted Variance Transactions are saved in the KSTR####.DAT files along with all other Keystroke transactions (Sales, Purchases, etc.). To view or edit a Posted Variance Transaction, navigate to the Variance Menu and select the Edit option.
How To Enter a Variance - Step By Step
1) Close the store for the physical inventory count.
No movement of merchandise should take place and no transactions should be entered until Step #7 below is reached. If unable to close the entire store, consider doing a Variance one department at a time or one aisle at a time.
2) Navigate to the Variance Sub-Module
From the Keystroke Main Menu, select Database Manager, then select Variance from the Special Menu.
Verify the Variance Parameters are set as needed (located under Variance Menu, Parameters).
3) Enter the Inventory Items onto the Variance Screen
Items may be entered manually, using the Auto-Fill [Shift]+[F8] function or Import File function from the Special Menu. When entering an Inventory Item that is a Matrixed Item, press [F10] from the Select Matrix Item list/grid to auto-fill in all the active Matrix Items. Note: [F10] to auto-fill active Matrix Items works only if the Variance Mode Matrix Entry Parameter is set to Multiple Item mode and no quantities have already been entered for any of the Matrix Items.
4) Save the Variance (press [F10] and select Save)
Save the Variance frequently as it is updated. Saving does not make changes to the QOH.
5) Print Count Sheets
Print the Displayed Report (Reports Menu, Displayed) using the Current Variance - Count Sheet form.
6) Physically Count Your Inventory
Count the Inventory items and write down the physical quantities on the Count Sheets. A data collector may be used to record the physical quantity information.
7) Open the Store
The store may now be re-opened and movement of merchandise may resume. Transactions may now be entered. Because the Saved Variance Transaction (from Step 4) includes a "snap-shot" of the quantity on hand in Keystroke, the physical counts may be entered as time permits.
8) Enter the Physical Quantities
Enter the physical quantities from the count sheets into the Physical column on the Variance screen. Be sure to save the Variance periodically. If a data collector was used to collect the physical quantity counts, the file from the collector may be imported into the Variance using the Import File function located under the Special Menu.
9) Post the Variance
When all quantities have been entered, post the Variance by pressing [F10] and selecting Post. Posting updates the Quantity On Hand on the Inventory Records by the number in the Variance Column for each item on the Variance.
Note: When a Variance is posted that includes items that have not been confirmed after using the Auto-Fill function, a message is displayed asking to "Change items not confirmed to quantity = 0". Answer Yes to do so, or No to post only the items that have been counted. Select Cancel to return to the un-posted variance. Answer Yes only if you have counted all items included on the Variance Transaction.
See:
Variance Sub-Module Contents