To set up the Cayan Genius:
- Complete all the steps described in the Cayan Genius Setup Instructions PDF up to the Setup the PIN Pad in Keystroke section.
- Select PIN Pad from the Configuration Manager Hardware menu.
- Select the PIN Pad Type button.
- Choose the Cayan Genius option from the list.
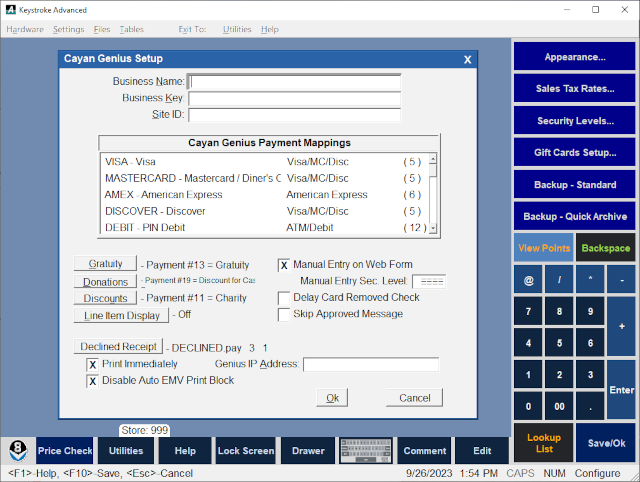
- Select the Setup button to display the Cayan Genius Setup screen.
- Enter the Merchant Business Name, Business Key, and Site ID (this information is provided by Cayan).
- In the Cayan Genius Payment Mappings box map the Genius Payment Codes (displayed in the left column) to the desired Keystroke Sales Payment Types (press [Enter] to select a Keystroke Payment Type for each Genius Payment Code).
Note: All Genius Payment Codes must be mapped, even if the Code will never be used. If support for a new Genius Payment Code is added to the Genius device by Cayan, it also needs to be added to the Payment Mappings list (select the [Add New] option at the bottom of the payment list or press [Ins] to add the new Genius Payment Code). The Cayan Genius device accepts a wide variety of payment types. Once a payment is completed it reports back which Payment Code was used. Keystroke must then convert (or map) this Payment Code to the appropriate Keystroke Sales Payment Type.
Keystroke recognizes that Cayan Genius is being used and when entering a new payment in Keystroke, hides all the payments mapped to a Cayan Genius payment and adds three new payments called "Selected by Customer", "Split Tender", and "Manually Entered Payment". The position of these payments on the payment list is determined by the position of the first mapped payment. To change the payment order, use Cut/Paste in the Configuration Manager - Sales Payment Types function.
- Support for EBT SNAP payments (used to be called Food Stamps) is available. In order to use this payment type the Genius device must be updated to App Version 5.1.3.2 or later, the merchant account must be set up correctly by Cayan, and the EBTSNAP Cayan payment must be mapped to a valid Keystroke Sales Payment Type. The payment to which EBTSNAP is mapped should always include Pay Formulas so that only eligible items may be purchased with this payment type. Once set up, if a transaction has eligible items on it (as defined by the Pay Formulas on the payment mapped to EBTSNAP) and the customer pays with an EBT Card, the Genius device asks if they want to use EBT SNAP or EBT Cash. EBT SNAP through the Genius device may be disabled by leaving the payment mapping blank. If it is mapped to a payment, pressing [Del] on the EBTSNAP payment type removes the mapping. Note: Do not attempt to use EBT SNAP without the proper Genius App version.
- Select the Gratuity button to specify how this amount is added to the transaction. It can be added as either the payment number specified or as a line item using the specified Inventory Stock Number. It is recommended to always set this up even if it might not be used. It may be set to None, but Keystroke displays a warning about it, potentially causing confusion when completing a sale. Note: If the Line Item option is used, the Inventory Item must be Non-Taxable and Non- Discountable (blank Price Code).
- Select the Donations button to specify how this amount is added to the transaction. It can be added as either the payment number specified or as a line item using the specified Inventory Stock Number. It is recommended to always set this up even if it might not be used. It may be set to None, but Keystroke displays a warning ` about it, potentially causing confusion when completing a sale. Note: If the Line Item option is used, the Inventory Item must be Non-Taxable and Non-Discountable (blank Price Code).
- Select the Discounts button to specify how this amount is added to the transaction. It can be added as either the payment number specified or as a line item using the specified Inventory Stock Number. It is recommended to always set this up even if it might not be used. It may be set to None, but Keystroke displays a warning about it, potentially causing confusion when completing a sale. Note: If the Line Item option is used, the Inventory Item must be Non-Taxable and Non-Discountable (blank Price Code).
- The Line Item Display button may be set to On to enable Keystroke to update the Genius device to display the line items (up to a maximum of 200 line item) from the sale as they are entered. Note: When loading a previously saved transaction, only the last 40 items are sent to the device. When the "On w/ Upload" option is selected the Genius device uploads the line item data to the Cayan servers. Note: The On w/ Upload interface supports only quantities from -99 to 999 and no fractions. If a line item does not meet this requirement it will be uploaded with a Qty of 1 and the price set to the total amount for that item (Qty*Price). Also, due to restrictions on the length of the fields, the Description will often be truncated down to as few as 9 characters.
- The Manual Entry on Web Form setting is used to launch Cayan's Web Based Payment Entry Window when "Manually Entered Payment" is selected from the payment list.
(instead of prompting for the card information to be entered on the payment device). Note: While the entry of payment information may be easier using the web form and a computer keyboard, the computer keyboard is not a secure device and can be used as the instrument of a data breach. It is therefore recommended that this parameter be left OFF and the card be manually entered on the Cayan Genius device.
- The Manual Entry Sec. Level setting is used to define the Clerk Security Level required to use the Manual Entry on Web Form function.
- If the Delay Card Removed Check setting is On, then after a payment has been processed Keystroke continues to the Print Button box even if the PIN Pad has not yet returned to its Ready Screen. However, Keystroke will halt when leaving the Print Button box, or the Complete Sale screen, or when entering another payment until the PIN Pad shows that it has returned to its Ready Screen. Note that it is recommended to leave this parameter Off because turning it on can result in a customer leaving their card behind. Also, turning it on may be in violation of PCI regulations exposing the merchant to liability if a card is stolen and used in a fraudulent manner due to it being left in the PIN Pad device.
- The Skip Approved Message setting is used to bypass the payment approved message display. If there is no Print Button for the payment and the payment is approved, the Skip Approved Message parameter also skips the [Ok] button (i.e., it works the same as if there was an automatic Print Button with the Print and Continue setting enabled).
- Select the Declined Receipt button to define how to print a payment receipt for an EMV payment that was declined. It is required that when an EMV payment is declined that a printout of the decline be given to the customer. If this button is not set up, Keystroke automatically uses the DECLINED.PAY form, sends it to Printer #3 (Receipt), and Print Immediately is treated as On.
When an EMV payment is declined, the Declined message display includes a Print button that may be used to print the payment receipt for the customer that includes the required EMV information. Once the receipt has been printed, the message is displayed again so the receipt can be re-printed if necessary. Note: Once the Cancel button (or [Esc] key) is used to close the Declined message display, all the payment information is discarded and the receipt can no longer be printed.
- The Print Immediately setting is used to print the Declined Receipt automatically.
- The Disable Auto EMV Print Block setting is used to prevent EMV fields from automatically printing at the bottom of the receipt if no EMV fields have been set on the receipt form (which is normally required by merchant service providers).
- The Genius IP Address setting is used to enter the IP Address for the Genius device. Each Cayan Genius device must have a unique IP Address and must be paired up to the correct workstation.
To verify the Cayan Genius device's IP Address and Application/OS Version:
After the device is powered up and the Red Genius Screen is displayed, enter 000 on the KeyPad and enter the password 9416557. Then press the Enter button (Green Circle button) to accept the password. The IP Address should now be displayed on the main status screen. The following app version is required:
App Version: 5.13.2 or later
If the app version is not correct, call Cayan Tech Support at: 800-941-6557 x2151 and have them update it by "pushing" the update to the device.
Note: The Cayan Genius device should be set to Static IP mode (and not Dynamic IP mode).
Note: Do not use the device in Dynamic IP mode as this can cause the IP address to change without notice and then Keystroke will no longer be able to communicate with it (or may end up communicating with a device sitting next to a different workstation).
Once the IP Address is entered into Keystroke, beginning with v8.00.85, it is stored in a data file in the special system folder for "Common Application Data" (same location KeyMail uses to store its settings). The file name is MWGenius.xml. If the file does not exist, the entry in the Windows Registry will be copied to it automatically.
In versions earlier than v8.00.85 the IP Address was stored on each machine's registry as a string value named "IPAddress":
HKEY_LOCAL_MACHINE\SOFTWARE\Wow6432Node\KeystrokePOS\MWGenius (64-bit)
HKEY_LOCAL_MACHINE\SOFTWARE\KeystrokePOS\MWGenius (32-bit)
Note: If there are issues saving the IP Address, try using the "GeniusIP=xxx.xxx.xxx.xxx" Startup Switch or WS#.INI file setting. These overwrite the registry values..
With the exception of the Genius IP Address setting, the information entered on the Cayan Genius Setup screen is stored in the file MWGenius.DAT located in the current Data folder and is shared by all workstations set to use the Cayan Genius PIN Pad. The file is in XML format and can be edited with a plain text editor (the Business Name, Business Key, and Site ID values are encrypted).
- Select the [OK] button or press [F10] to save all the information entered on the Cayan Genius Setup Screen. Then return to the PIN Pad screen to test the PIN Pad.
- Select the Test PIN Pad button on the PIN Pad screen, then select the [Ok] button on the PIN Pad Test screen, then select the [Ok] button on the Testing Cayan Genius screen to test the Genius device configuration settings. Click Ok on the Transport Key window. Follow the prompts on the screen of the Genius device as if you were completing a real Credit Card transaction. The Testing Cayan Genius screen with Status at the top will be displayed. Review and click [Ok] to continue. The "Remove Payment?" prompt is displayed. Click [Ok] three times. Then click [Ok] one last time to save the settings. The PIN Pad set up is now complete.
HotKeys, Macros, or Toolbar Buttons used to select any of the Mapped Payment Types will activate the Selected By Customer options. When this payment is used, Keystroke begins the payment process by communicating with Cayan about the payment. The Transaction ID information is sent to either the Genius device (for Selected by Customer and Split Tender) or to the Cayan Transport Payment Entry Web site (for Manually Entered Payment).
The Genius device (or Cayan Web Site) is then used to complete all the payment entry, authorization, and capture processes directly with Cayan. Once completed, the device (or web site) informs Keystroke about the status of the payment. If the payment is approved, Keystroke adds the payment to the transaction based on the payment mappings.
Note: When the PIN Pad is set to Cayan Genius, Keystroke does NOT set the Auth Methods on all Gift Card Triggers to None. Verify that the Gift Card Triggers (under Configuration Manager, Tables, Gift Cards) are all set to None. An easy way to do this is to edit the Default - [Ctrl+F7], set the Auth Method at the bottom to None, and click [Ok]. This procedure prompts to make the same change to other matching triggers. Answer Yes. Gift Card triggers can be setup with different Auth Methods if another method is to be used to process gift cards.
See:
Cayan Genius Setup Instructions PDF
Configuration Manager Contents